

While the hubs was out of town, I camped out for a couple nights in the guest bedroom to check it out. The change of view was pretty fun. One of the things I noticed was how the sun seemed to arrive slightly earlier and brighter than my own bedroom; despite the existing window shades. Obviously I'm exaggerating, but I thought adding curtains might be a nice touch to soften the look of the room, added functionalality, and it'd be a fun sewing project for me.
Sewing my split shower curtain last year used a lot of the same elements used to make window drapery panels. Admittedly, I cheated on the header, but the process allowed me to learn about the construction and sewing of lined curtains.
This time I aim to make professional lined curtains! Yay!
I'm using this post to walk through the planning process since it takes a little advanced planning. Sorry if this is boring, but maybe it might help someone else out there.
To Start
I'm using this post to walk through the planning process since it takes a little advanced planning. Sorry if this is boring, but maybe it might help someone else out there.
To Start
- Pick the fabric (note the amount of pattern repeat if fabric isn't solid)
- Select the type of lining you want (black out?)
- Window dimensions
- Curtain rod or curtain track with hooks (see notes below regarding the width you will need)
- Decide on type of drapery heading you want

Fabric Selection
Everyone's favorite part!
I ordered more than a few swatches of fabric, but I'm honestly glad I did because the line between ivory and white is blurry when judging from a computer. Some of my favorites had to be eliminated based on this alone.

Leader board as of today:
#1 Robert Allen's Bella Porte (aka Gate)
#7 Michael Miller Bekko Home Decor Parquet
#8 Premier Prints Towers Navy Blue
Measure the Window AND Add Extra Length to Rod
The window is the same size in the illustration! But see how much better the "do" window on the right looks?
We don't want to block the view when the curtains are open, we need the curtain rod to extend beyond the window's edges so the fabric hangs in front of the wall and not in front of the window.
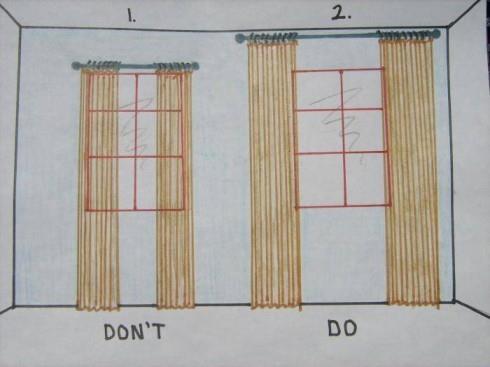
The guide to determine the amount of room needed for the curtain "stack back" (the fabric width when pushed open).
Use 20% for lined medium weight fabric to 30% for blackout lined heavy weight fabric.
This number, should be added to the width of your actual window opening.
Viola! The total is the length of rod needed for your window.
Example: My window: 108" high x 100" wide
Use 20% for lined medium weight fabric to 30% for blackout lined heavy weight fabric.
This number, should be added to the width of your actual window opening.
Viola! The total is the length of rod needed for your window.
Example: My window: 108" high x 100" wide
My stack back (using 30% since I plan to use blackout lining):
100" window width x 30% = 33"

Rod length needed: 100" window width + 33" stack back = 133"
 What style drapery heading do you want?
Once you start googling drapery headings, you'll get a sense of what works best in your own room.
Example: For my guest room, I selected a style known by many names: Ripplefold / serpentine style / s-wave style. Which will layer over the existing window coverings on a ceiling mounted track to create a look similar to this nursery's window and like Restoration Hardware's Ripple-Fold Drapes.
Using Magic to Create the Header...
Those fancy curtain headers are easier to make than you think! I learned there's product called drapery tape that is sewn to the back of curtain panel to transform them.
Here's a video demonstrating the pleated version of drapery tape, which is what they used when the professional workroom custom made the curtains hanging in my living room.
Example: I'll be using Rowley's TT31 "Clip-n-Wave" heading tape for my curtains, seen in this video.
Since Ripple Fold is unique to Kirsch and can *only* be used with their track system (demonstrated in this video) it can all be quite pricey. Luckily I discovered that Rowley makes a drapery tape to mimic the look that can be hung with either clips OR curtain hooks. Yay me!
Enough talk, how much fabric do I need?
Depends on which curtain header you selected.
On each of Rowley's page of various drapery tapes, they are wonderful enough to include a link to a .pdf page of instructions specific to each kind of drapery heading tape! And they've also posted a few videos if you want to search YouTube.com for help.
Example:
I'm going to step through the Clip-n-Wave tape's instruction page but you would need to step through the instructions specific to the header tape you select (I noticed they have different requirements for fullness).
A) Number of Fabric Widths Needed
(133" rod width x 2.25 fullness) / 54" fabric width = 5.54
which we then round up to next whole number = 6 fabric widths
B) Drapery Cut Length
107" tall + 8" top hem + 8" bottom hem + 2" shrinkage allowance + 4.5" vertical pattern repeat = 129.5" cut length*
* Be sure to adjust height of curtain to allow for your curtain rod, my ceiling mounted track will drop the curtains down, so I subtracted their height. Which happens to just be one inch for me.
C) Total Fabric
6 fabric widths (A) x 129.5 cut length (B) = 777 / 36" inches = 21.58 yards required
Same formula for your lining. Mine equaled 20.67 yards (less because there isn't a fabric repeat on the lining).
Shopping List for My Window's Curtains
22 yards Dwell fabric
21 yards blackout lining
thread to match
8.5 yd drapery tape (133" rod width x 2.25 fullness / 36")
8.5 yd buckram header
curtain hooks
curtain hem weights
I wonder how long it'll take me to collect all the notions. Wish I could have them up before our next visitors stay in our guest room! Not likely. Mounting the ceiling track is going to take some additional effort. Meh.
UPDATE:
Click here for curtain sewing steps 1-5
Click here for final curtain sewing steps 6-10
What style drapery heading do you want? Once you start googling drapery headings, you'll get a sense of what works best in your own room.
Example: For my guest room, I selected a style known by many names: Ripplefold / serpentine style / s-wave style. Which will layer over the existing window coverings on a ceiling mounted track to create a look similar to this nursery's window and like Restoration Hardware's Ripple-Fold Drapes.
Using Magic to Create the Header...
Those fancy curtain headers are easier to make than you think! I learned there's product called drapery tape that is sewn to the back of curtain panel to transform them.
Here's a video demonstrating the pleated version of drapery tape, which is what they used when the professional workroom custom made the curtains hanging in my living room.
Example: I'll be using Rowley's TT31 "Clip-n-Wave" heading tape for my curtains, seen in this video.
Since Ripple Fold is unique to Kirsch and can *only* be used with their track system (demonstrated in this video) it can all be quite pricey. Luckily I discovered that Rowley makes a drapery tape to mimic the look that can be hung with either clips OR curtain hooks. Yay me!
Enough talk, how much fabric do I need?
Depends on which curtain header you selected.
On each of Rowley's page of various drapery tapes, they are wonderful enough to include a link to a .pdf page of instructions specific to each kind of drapery heading tape! And they've also posted a few videos if you want to search YouTube.com for help.
Example:
I'm going to step through the Clip-n-Wave tape's instruction page but you would need to step through the instructions specific to the header tape you select (I noticed they have different requirements for fullness).
A) Number of Fabric Widths Needed
(133" rod width x 2.25 fullness) / 54" fabric width = 5.54
which we then round up to next whole number = 6 fabric widths
B) Drapery Cut Length
107" tall + 8" top hem + 8" bottom hem + 2" shrinkage allowance + 4.5" vertical pattern repeat = 129.5" cut length*
* Be sure to adjust height of curtain to allow for your curtain rod, my ceiling mounted track will drop the curtains down, so I subtracted their height. Which happens to just be one inch for me.
C) Total Fabric
6 fabric widths (A) x 129.5 cut length (B) = 777 / 36" inches = 21.58 yards required
Same formula for your lining. Mine equaled 20.67 yards (less because there isn't a fabric repeat on the lining).
Shopping List for My Window's Curtains
22 yards Dwell fabric
21 yards blackout lining
thread to match
8.5 yd drapery tape (133" rod width x 2.25 fullness / 36")
8.5 yd buckram header
curtain hooks
curtain hem weights
I wonder how long it'll take me to collect all the notions. Wish I could have them up before our next visitors stay in our guest room! Not likely. Mounting the ceiling track is going to take some additional effort. Meh.
UPDATE:
Click here for curtain sewing steps 1-5
Click here for final curtain sewing steps 6-10
zielony flaming Hey there, excellent site you have at this time there.
ReplyDeletehttps://kosmetikana.pl Many thanks for sharing this nice web site.
ReplyDeletenatury-smak.pl Maintain the excellent work !! Lovin' it!
ReplyDeletehttp://nutrisolutions.pl Fantastic internet site you have got in here.
ReplyDelete