Finished this somewhat modern scrappy baby quilt recently from a free tutorial I found via Pinterest (link below). I even appliqued the baby's name on the back of the quilt - my first time to applique! And the binding is actually stripes of all the fabrics used on the front.
Showing posts with label sewing. Show all posts
Thursday, March 31, 2016
Sewing Reveal: Modern Scrappy Baby Quilt & Link to Free Tutorial
Finished this somewhat modern scrappy baby quilt recently from a free tutorial I found via Pinterest (link below). I even appliqued the baby's name on the back of the quilt - my first time to applique! And the binding is actually stripes of all the fabrics used on the front.
Tuesday, December 30, 2014
Creative Goals for Me & My Home
A few projects have been dancing in my mind lately, but since I have been traveling recently, they haven't gained any ground.
These are my optimistic DIY goals for decorating and sewing in the upcoming 2015 year...
Sunday, November 16, 2014
Sewing DIY: the Perfect Non-Slip, No-Headache, Sweatyband Inspired Headband
If you have a Sweatyband brand headband, you know how terrific they are at staying put all day and not causing headaches. And that they are amazing for athletic activities! You also know how pricey the little buggers can be, retailing for about $15 each band. I used my best reverse engineering skills to make my own version and wanted to share the "how to steps" because they really turned out to be just as great as the original version.
On the left in the photos below is my version for about $4 and the $15 Sweatyband version on the right. Twinsies, right? My favorite glitter ribbon headband only cost about $2 each to make. What a great gift to slip into someone's stocking this holiday! And did I mention you can toss them in with your regular wash?
Instructions below the fold.
Friday, October 31, 2014
Sewing: Lined Curtains (Steps 6-10)
Continuing the steps to sew the curtain panels...
Before and after, what a difference!
Previously we
* Determined how much fabric we need
* Completed the sewing steps part one of this post (steps 1-5)
Before and after, what a difference!
Previously we
* Determined how much fabric we need
* Completed the sewing steps part one of this post (steps 1-5)
Sewing: Lined Curtains (Steps 1-5)
While it's easy enough to buy curtain panels, they typically only come in standard sizes and windows tend to be anything but standard, which is why you are probably here trying to decide if it's worth making your own.
If you have a sewing machine (or can borrow one), the answer is YES! Try not to be intimated by the outrageous pricing of custom drapes. The online quote for drapes in the exact same fabric was $1,992. Sewing a few straight lines is child's play compared to that sticker shock.
If you are following along from my last post where we calculated fabric needs, you hopefully have your curtain rod or curtain track hung with the hooks/clips to make measuring easier for the next steps. If you don't, no worries, I didn't have my curtain track up, so I found its measurements and the measurements of the carriers for my curtain track online to help me plan (carriers are the equivalent of a drapery ring when using curtain tracks).
The steps below assume you have purchased the amount of fabric needed, found in the previous post explaining how to calculate fabric needs. I've tried to cut down the explanation to make it easier to just follow step by step without getting too lost in the details, but included links to tutorials I found helpful if you need more explanation. And amazon links are affiliate links.
If you have a sewing machine (or can borrow one), the answer is YES! Try not to be intimated by the outrageous pricing of custom drapes. The online quote for drapes in the exact same fabric was $1,992. Sewing a few straight lines is child's play compared to that sticker shock.
If you are following along from my last post where we calculated fabric needs, you hopefully have your curtain rod or curtain track hung with the hooks/clips to make measuring easier for the next steps. If you don't, no worries, I didn't have my curtain track up, so I found its measurements and the measurements of the carriers for my curtain track online to help me plan (carriers are the equivalent of a drapery ring when using curtain tracks).
The steps below assume you have purchased the amount of fabric needed, found in the previous post explaining how to calculate fabric needs. I've tried to cut down the explanation to make it easier to just follow step by step without getting too lost in the details, but included links to tutorials I found helpful if you need more explanation. And amazon links are affiliate links.
Thursday, July 10, 2014
Next Project: Lined Curtains for Guest Room
Have you ever slept in your guest bedroom? Not a nap, but a real overnight visit to experience the bedroom from your guests' perspective? It sounds completely logical, but it never crossed my mind until an article suggested doing just that to help you discover what your guest room might be missing.
While the hubs was out of town, I camped out for a couple nights in the guest bedroom to check it out. The change of view was pretty fun. One of the things I noticed was how the sun seemed to arrive slightly earlier and brighter than my own bedroom; despite the existing window shades. Obviously I'm exaggerating, but I thought adding curtains might be a nice touch to soften the look of the room, added functionalality, and it'd be a fun sewing project for me.
Friday, June 20, 2014
Sewing Reveal: Baby Kaitlyn's Herringbone Quilt
This sweet little quilt will be gifted to a friend in celebration of her baby girl. This is the second herringbone quilt I've made and this one went much quicker, but it being baby sized probably has more to do finishing it quickly than my prowess as a sewer.
Inspiration for this quilt was this adorable sleeping owl mobile in the baby's room. I thought about adding an applique owl to the back, but I chickened out since I have never done applique before. Since this was a gift; figured it wasn't the best time to experiment.
| Quilt Inspiration: Baby Kaitlyn's Owl Mobile in Lavender and Teal |
Inspiration for this quilt was this adorable sleeping owl mobile in the baby's room. I thought about adding an applique owl to the back, but I chickened out since I have never done applique before. Since this was a gift; figured it wasn't the best time to experiment.
Sunday, June 1, 2014
Sewing Reveal: Herringbone Quilt
Finished the Herringbone quilt I shared as a work in progress (WIP) on this post. But I never actually posted the final "ta da" photos. Please say hello to my most recently finished sewing project!
Monday, May 12, 2014
New Sewing Machine! Brother PC420PRW Project Runway
Now that I've sewed with my new sewing machine enough to make the herringbone blanket, I thought I'd share my thoughts on moving from a 15 year old mechanical machine (Singer 4830C) to a new computerized machine. And my general thoughts on my new Brother PC420PRW sewing machine.
Sunday, April 13, 2014
Next Project: Herringbone Quilt (WIP)
While looking at potential new sewing machines, I found an easy quilt as you go tutorial for a herringbone blanket. These first photos show my work-in-progress. The "quilt as you go" concept was new to me, but basically you sew the quilt pieces to the batting creating panels instead of blocks. See the white strip poking out? That's my batting. Check out the tutorial by Maureen Cracknell and her flicker group to see other blankets made using the same tutorial (this pink baby version is a fav of mine).
Monday, March 17, 2014
Sewing Reveal: Custom Bench Seat Cushion for Pottery Barn Entryway Bench
I made this bench cushion for my friend Katy who scored this Pottery Barn bench from Craig's List - and it was easier than it looks - I promise! Her husband was redoing the finish from black to the current dark wood stain when I was over at their house. We were chatting about their new score and I offered to make a cushion for them with the caveat that I had never done this before. Being as awesome as they are, they weren't scared of my sewing skills at all!
Thursday, February 13, 2014
Sewing Pics! Mom's Colorful Baby Blanket
My mother just finished a chenille baby blanket and it was so pretty, I had to post a few photos.
The bright colors are so fun and it's great high contrast for a newborn. And for a boy, something outside of the norm.
Sunday, November 3, 2013
Sewing Reveal: Hand Cut Chenille Blanket for Baby Boy Reid
I can't get enough of these hand cut chenille baby blankets! This is the third one I've made and every time I gift one away, I think I need to make one to keep for myself.
This is the first blanket I've made for a boy, this time I went with a geometric patterned fabric. Have to say, it was pretty awesome to not have to mark the rows out for stitching and just use the fabric itself as my guide. My lines were super straight this time!
And I actually made my own bias tape binding this go round too! Whoot whoot!
I used the same red fabric for the binding as I used as the "backer" fabric that I place behind my cut chenille rows (but I leave it un-cut, so you can see hints of red peeking through).
This is the first blanket I've made for a boy, this time I went with a geometric patterned fabric. Have to say, it was pretty awesome to not have to mark the rows out for stitching and just use the fabric itself as my guide. My lines were super straight this time!
And I actually made my own bias tape binding this go round too! Whoot whoot!
I used the same red fabric for the binding as I used as the "backer" fabric that I place behind my cut chenille rows (but I leave it un-cut, so you can see hints of red peeking through).
Saturday, September 28, 2013
Sewing: Bias Yardage Calculator
Calculating the amount of fabric needed for your bias binding can be tedious.
I always have to look up sewing formulas and work out the math, usually while sitting in the car outside the fabric store. By having a little excel worksheet here online, hopefully it'll make it that much faster next time.
Just enter the appropriate numbers in the 3 highlighted fields.
Calculations are based on the "Magical Math Formula" tutorial found at Sew4Home. The math is the same as above, but a lady can go cross eyed trying to read through that and do the math on a small phone screen while sitting in the car. ;)
I always have to look up sewing formulas and work out the math, usually while sitting in the car outside the fabric store. By having a little excel worksheet here online, hopefully it'll make it that much faster next time.
Just enter the appropriate numbers in the 3 highlighted fields.
Calculations are based on the "Magical Math Formula" tutorial found at Sew4Home. The math is the same as above, but a lady can go cross eyed trying to read through that and do the math on a small phone screen while sitting in the car. ;)
Thursday, April 25, 2013
Next Project: Sewing a Duvet Cover
Haven't really liked the bedding in the guest bedroom ever since it returned from the storage time capsule - nearly TWO years ago. Gah. That's a long time to keep something you really don't like, so one day I donated the bed set to Salvation Army to properly motivate me to take action. I searched high and low for a duvet cover I loved with little results.
Then I found a duvet cover who's name we must not say, Volder-JonathonAdler-mort, that I lost on eBay at the very last minute. I mean, I was already calling it mine and sent a photo to show off to a friend, then BAM blindsided by a new bidder when the clock was counting down with just SECONDS left. Of course I tried to find the same one, but nada. Sigh.
And when you can't find what you want at the stores, the only answer is of course... CUSTOM.
Right now I'm scheming a plan to make a queen size duvet cover for the guest bed. Sometimes DIY makes my wheels spin too much because now the options are nearly limitless. But still - I've been looking at fabrics for the duvet cover off and on for about 2 months. Now it's April 25 and I have guests coming on May 16 and no duvet cover. If I don't finish, it's okay, I have a quilt in the closet as my back-up plan.
The Premier Prints' Mandarin collection has some fabrics that I'm considering... #10 is from a different collection, so I ordered a sample of it and a few of the others. Since most are light weight and a few are medium weight, I wanted to see the difference. And check to see if #10 will coordinate with the others.
Duvet front: #10 if the teal matches the teal in the PP fabrics. #11 as second choice.
duvet back: #7 if I can find the fabric (back ordered) or maybe dots on #9?? Or the chevron?
euro shams (2): Really like #2 chevron as for shams. It's a medium weight fabric, so that might work.
accent pillow: depends on everything else. Ha! But #5 & #6 & #9 are top favorites for accent pillow.
In a perfect world, the chevron would come in teal, but their teal material has a white background instead of natural like the others. No go. Frustrating. I see why people shop on Spoonflower.
It's times like this that I wish I knew a store that carried trendy decor fabrics. I ventured out to a HUGE fabric warehouse (3 stories!) earlier this week and was severely disappointed. Their variety of notions were tempting, but after price checking on my phone (don't you love that technology can do that?!) I decided to pass.
Monday, April 15, 2013
Sewing Reveal: Hand Cut Chenille Blanket
Ta da! Just finished this hand-cut chenille blanket for Baby D last weekend and it was a big hit with the parents-to-be at their baby shower. Surprisingly, it only took about 3 and a half days to make. I just adore the blanket's bright colors!
Here's the hand cut chenille baby blanket I made previously; both are based on the fabulous tutorial found over at Aesthetic Nest. Be sure to take a look at the Flicker Group photos for inspiration. One blanket added tiny pom pom trim around the binding.
Based on the registry, I knew the baby girl's bedding was going to be green and blue. Hopefully it coordinates with her room, but regardless, I imagine Baby D will use this more as a play mat or stroller cover than anything else.
On the close up photo of the faux chenille side, you can see the layers of flannel material that are cut to create the super soft rows of wavy chenille. It really is a cozy blanket. The hubs even asked if it were possible to make an extra large blanket for him.
Baby Chenille Blanket Shopping List
◊ 1.5 yards of each fabric x 6 layers. My finished blanket measured around 40" x 50"
◊ Two packages of 0.875 inch double fold quilt binding that were 3 yds each. (Next time make my own!)
◊ Matching thread - the chenille channels use a ton of thread. I used a natural color thread for the top printed fabric and pink in my bobbin for the chenille side (green would have been the norm, but I was in a playful mood and I already had pink at home).
And get this, I completely forgot about needing teal thread for the binding BUT it turns out the thread I used for my split shower curtains was a perfect match! Sometimes it pays to be forgetful.
2) Hot pink broadcloth
3) Pastel pink flannel
4) Printed pink flannel w/ green butterflies (on sale!)
5) Printed green flannel w/white print (on sale!)
6) Solid green flannel
4) Printed pink flannel w/ green butterflies (on sale!)
5) Printed green flannel w/white print (on sale!)
6) Solid green flannel
Then I only cut the layers of flannel into the chenille rows, leaving the print and super bright pink. I was a little nervous about using the pink with green butterflies, wondering if it would blend into the background enough. I think it worked out great on this blanket - and at just $3/yd - can't beat it.
The bright pink fabric on the bottom of the stack is a broadcloth cotton/poly fabric that I used as a "backing" of sorts to pop behind the chenille rows. Since I used the solid green flannel as the top most layer to make the chenille, I knew it would appear most prominently so I thought a high contract color like candy pink would look nice. Plus the extra layer gives the blanket a little more heft since the top fabric is just your average light weight quilter's cotton.
This blanket was so fun to make - I'm already thinking about making the next one!
Tuesday, April 9, 2013
Sewing Reveal: Split Shower Curtain Drapes
Super excited to show off my new shower curtain panels! These are functional shower curtains - and hung on just one shower curtain rod. Yippee!
It felt so good to finish them and even better to finally have something hanging up in the bathroom. It was impossible to get a decent photo, they're over 8 feet tall and in our smallest bathroom (no room to get a wide shot).
My hubs was super sweet and let me drag him out of bed (he was reading) to indulge me to go see them finished and hanging up. You know that giddy feeling of finally finishing... I was bursting to show him the mess on the dining table was worth it.
It felt so good to finish them and even better to finally have something hanging up in the bathroom. It was impossible to get a decent photo, they're over 8 feet tall and in our smallest bathroom (no room to get a wide shot).
| Lining ready to be pinned |
After I schemed the details out of what I wanted to make, I used Midwest Magnola's tutorial on sewing lined curtain panels. After poking around a lot of sites, hers was by far the clearest. If you can't tell, I respond to lots of photos, and she had photos of each step. I measured my shower and decided I wanted each panel to measure 36" x 98".
For the Borders
I wanted the corners mitered, like how the points of a photo frame come together at the perfect angle. The tutorial at Saltwater Quilts helped get that done. Once the border attached was attached, I just treated the it all like one piece of fabric for Midwest Magnola's instructions.
Then followed the tutorial's instructions for attaching the lining and finishing the bottom hem.
Finishing the Top Hem
I finished the top hem differently than the tutorial since I wasn't planning to use clip rings and was using a 5" hem. I had read another tutorial that suggested an even bigger hem (as in 10-15" extra fabric, folded over). But it seemed a bit excessive me and I was a little short on fabric so I improvised and sort of split the difference between the tutorials.
- Turned down the fabric 6" and pressed. Then open. That crease will the the top of the curtains when it's all done, so I inserted header tape here to give it more structure - you can sort of see the white strip showing through the lining in the photos below. I just basted by hand to be at the very top of my hem once it's finished.
- Then turn down fabric edge 1/2" and press, then turn again and press. So you have a nice finished edge (like the photo on the right).
- I tucked a stripe of witch stitchery, then sewed the folded edge and witch stitch.
- Ultimately I decided a tab backed panel was the way to go since I wanted to hide the shower rod. Using grosgrain ribbon was the easiest, so I cut 7 "tabs" and spaced them out evenly. I picked 7 to correlate with the number of holes on the plastic liner. And rather than sewing them down flat, I used a spool of thread as a guide after seeing the tip here.
- This would be the time to sew the tabs on to the back most layer (in the right photo below, the tabs would be sewn to the section of material that is folded back). By attaching to just the one single back layer, there won't be a ton of nasty stitches on the front.
- Once the tabs are sewn on, just sew a straight line along the edge. Or you can take the easy way, like me and use more witch stitchery. Then iron accordingly.
My hubs was super sweet and let me drag him out of bed (he was reading) to indulge me to go see them finished and hanging up. You know that giddy feeling of finally finishing... I was bursting to show him the mess on the dining table was worth it.
Tuesday, March 19, 2013
Next Project: Shower Curtain Drapes
Pinterest is full of inspiration - but this time I decided to take action! Current project is making "shower drapes" for our hall bath. Our little batik art & towels coordinated well, but I could never find the right shower curtain. The look of split shower curtains really caught my eye - check out the photos that inspired me below.
Plus, the lack of a shower curtain was really starting to bug - it was time for something to happen.
Loving the split look of extra tall "shower drapes" (the gray & white striped here).
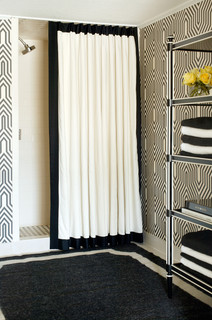
The style of the black & white bath with it's simple border and hidden hardware is perfect.
Planning the Layout
I toyed with a few ideas - but kept coming back to the simplicity of the edged border. Plan was to hang the panels high enough to cover the hardware and emulate the look of ceiling mounted tracks (as in the black & white example above). Finding just the right color of fabric available in BOTH colors became a challenge in itself, but JoAnn Fabrics online had exactly what I needed and lucky me, it was on sale.
Other layouts considered...
More Inspiration Photos...
my existing towels and batik art |
Plus, the lack of a shower curtain was really starting to bug - it was time for something to happen.
Loving the split look of extra tall "shower drapes" (the gray & white striped here).
The style of the black & white bath with it's simple border and hidden hardware is perfect.
![]() |
| my "sketch" of the shower curtain to match the towels |
Planning the Layout
I toyed with a few ideas - but kept coming back to the simplicity of the edged border. Plan was to hang the panels high enough to cover the hardware and emulate the look of ceiling mounted tracks (as in the black & white example above). Finding just the right color of fabric available in BOTH colors became a challenge in itself, but JoAnn Fabrics online had exactly what I needed and lucky me, it was on sale.
Other layouts considered...
More Inspiration Photos...
![]() |
| Mid-century yellow & gray on HGTV |
![]() |
| Atlanta Homes found on A Life's Design |
![]() |
| Cornice Board DIY by Gus and Lula |
![]() |
| Model home found by Beach Brights |
Monday, June 11, 2012
Itching to Stitch!
I'm sure I drove my friend S crazy today with a zillion emails on fabrics and sewing but she's sweet enough not to complain (love ya S!). She's expecting a baby girl on October 8 - I am having a blast virtual shopping with her even if we aren't in the same city.
After looking at all the blogs, fabric swatches and sewing websites, I'm dying to start a new sewing project. Although admittedly much of the things I admire are way above my sewing skill set. Kind of like shopping and always falling in love with the most expensive dress.
I can't get too excited and post too much since my friend S will see this and gifts are better when they are surprises, right? Plus, there's always the factor that if it's a total #fail then I can just pretend it never happened.
Just look at this dress! Isn't it super sweet for a little girl? I think my nieces are too old for this (although it sizes up to 13/14) - but they might indulge me and wear it long enough to send a few photos back. Just hard to compete with all the latest "must have" fashions that they are starting to like at that age.
This would be adorable in any of these materials for the July 4th holiday! I especially like the seersucker check fabric to help beat the summer heat. Too bad I'll be traveling between now and then and won't have time for any sewing.
Thursday, March 15, 2012
Sewing: Boppy for Baby
Do you ever want to sew, just for the sake of sewing?
That was me.
| Finished Boppy Cover |
I wanted to sew, but something small & fast and then I'd get the instant gratification I was craving. And let's face it, the stuff I really want to make, would be way too much of a project.
Eventually I decided on a Boppy pillow cover to coordinate with my friend's nursery colors. I had so much fun looking at the fabrics - I thought this fabric was girly but busy enough to hide any messes. Not that it would matter, since it has a handy zipper on the seam so you can toss it in the wash.
Only part I was nervous about was the fact that there were loads of free patterns floating around on the internet, but after printing a few, I realized they were no where near the same size!
Ended up using this Boppy Slip Cover Tutorial, and the recommended 1/2" seam allowance instead of pattern creators suggested 1/4".
My friend sent me a photo of it on her boppy - so relieved it fits! Yay!