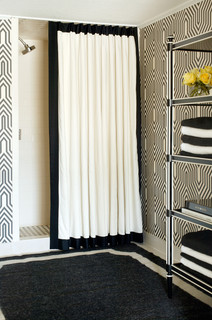
It felt so good to finish them and even better to finally have something hanging up in the bathroom. It was impossible to get a decent photo, they're over 8 feet tall and in our smallest bathroom (no room to get a wide shot).


 |
| On the right is the batik art that started it all |
 |
| Lining ready to be pinned |
After I schemed the details out of what I wanted to make, I used Midwest Magnola's tutorial on sewing lined curtain panels. After poking around a lot of sites, hers was by far the clearest. If you can't tell, I respond to lots of photos, and she had photos of each step. I measured my shower and decided I wanted each panel to measure 36" x 98".
For the Borders
I wanted the corners mitered, like how the points of a photo frame come together at the perfect angle. The tutorial at Saltwater Quilts helped get that done. Once the border attached was attached, I just treated the it all like one piece of fabric for Midwest Magnola's instructions.
Then followed the tutorial's instructions for attaching the lining and finishing the bottom hem.
Finishing the Top Hem
I finished the top hem differently than the tutorial since I wasn't planning to use clip rings and was using a 5" hem. I had read another tutorial that suggested an even bigger hem (as in 10-15" extra fabric, folded over). But it seemed a bit excessive me and I was a little short on fabric so I improvised and sort of split the difference between the tutorials.
- Turned down the fabric 6" and pressed. Then open. That crease will the the top of the curtains when it's all done, so I inserted header tape here to give it more structure - you can sort of see the white strip showing through the lining in the photos below. I just basted by hand to be at the very top of my hem once it's finished.
- Then turn down fabric edge 1/2" and press, then turn again and press. So you have a nice finished edge (like the photo on the right).
- I tucked a stripe of witch stitchery, then sewed the folded edge and witch stitch.


- Ultimately I decided a tab backed panel was the way to go since I wanted to hide the shower rod. Using grosgrain ribbon was the easiest, so I cut 7 "tabs" and spaced them out evenly. I picked 7 to correlate with the number of holes on the plastic liner. And rather than sewing them down flat, I used a spool of thread as a guide after seeing the tip here.
- This would be the time to sew the tabs on to the back most layer (in the right photo below, the tabs would be sewn to the section of material that is folded back). By attaching to just the one single back layer, there won't be a ton of nasty stitches on the front.


- Once the tabs are sewn on, just sew a straight line along the edge. Or you can take the easy way, like me and use more witch stitchery. Then iron accordingly.
My hubs was super sweet and let me drag him out of bed (he was reading) to indulge me to go see them finished and hanging up. You know that giddy feeling of finally finishing... I was bursting to show him the mess on the dining table was worth it.