

Showing posts with label decor. Show all posts
Showing posts with label decor. Show all posts
Wednesday, November 11, 2015
After Photo with Dining Room Updates
The updates to the dining area came together relatively quickly that I just realized I never posted an "after" photo after my previous post. This is the dining room as it is today after updating three elements.


Tuesday, August 4, 2015
Ch-ch-changes to our Dining Room
Minor updates to the dining area have started to happen around here (and I stress minor!)
 While the room was functional, it has never felt finished to me so my most recent focus was to try and give the dining area the attention it deserved.
Items to be addressed:
1) Change light fixture to one that's more to scale
2) dining chairs to something more comfortable and in a more updated fabric
3) hang something on that poor empty wall
4) centerpiece for table
Below are the items I've purchased so far.
** UPDATE **
New photos can be found here
** UPDATE **
 While the room was functional, it has never felt finished to me so my most recent focus was to try and give the dining area the attention it deserved.
Items to be addressed:
1) Change light fixture to one that's more to scale
2) dining chairs to something more comfortable and in a more updated fabric
3) hang something on that poor empty wall
4) centerpiece for table
Below are the items I've purchased so far.
** UPDATE **
New photos can be found here
** UPDATE **
Tuesday, December 30, 2014
Creative Goals for Me & My Home
A few projects have been dancing in my mind lately, but since I have been traveling recently, they haven't gained any ground.
These are my optimistic DIY goals for decorating and sewing in the upcoming 2015 year...
These are my optimistic DIY goals for decorating and sewing in the upcoming 2015 year...
Friday, October 31, 2014
Sewing: Lined Curtains (Steps 6-10)
Continuing the steps to sew the curtain panels...
 Before and after, what a difference!
Previously we
* Determined how much fabric we need
* Completed the sewing steps part one of this post (steps 1-5)
Previously we
* Determined how much fabric we need
* Completed the sewing steps part one of this post (steps 1-5)
Thursday, July 10, 2014
Next Project: Lined Curtains for Guest Room

While the hubs was out of town, I camped out for a couple nights in the guest bedroom to check it out. The change of view was pretty fun. One of the things I noticed was how the sun seemed to arrive slightly earlier and brighter than my own bedroom; despite the existing window shades. Obviously I'm exaggerating, but I thought adding curtains might be a nice touch to soften the look of the room, added functionalality, and it'd be a fun sewing project for me.
Monday, March 17, 2014
Sewing Reveal: Custom Bench Seat Cushion for Pottery Barn Entryway Bench
I made this bench cushion for my friend Katy who scored this Pottery Barn bench from Craig's List - and it was easier than it looks - I promise! Her husband was redoing the finish from black to the current dark wood stain when I was over at their house. We were chatting about their new score and I offered to make a cushion for them with the caveat that I had never done this before. Being as awesome as they are, they weren't scared of my sewing skills at all!

Thursday, March 6, 2014
Craft fail & recovery. Lining drawers with fabric, twice.
I won't lie. It took two attempts to line the nightstand's drawers in the guest bedroom. The second method was a keeper!
My first attempt to use "stiffened" fabric as a drawer liner was an utter failure. Using fabric inside the drawer seemed ideal - this way you can find something exactly your style and cover up the insides of the less than perfect vintage drawers.
The technique and instructions I found at Blue Eyed Yonder basically involved soaking fabric in a fabric stiffener and ironing fabric flat before it dries. Then you take your perfectly flat and stiff fabric and cut to the dimensions of the drawer and use double sided tape to make it stick. Hmmm. Sounds easy, right? And her Pinterest worthy photos show gorgeous results, so it obviously works for most people. Except for me.
Where I went wrong (if you're a skimmer, the last lesson is probably most important):
Saving the project
I realized if the steam in my iron was reactivating the dried fabric stiffener, then maybe I could wash out the stiffener and still use the fabric. I cut out a section of the fabric a few inches larger than the nightstand's drawer and rinsed it out with lots of water. The water had some bubbles and a light milky color, so I realized the fabric stiffener was actually washing out of the fabric. This stuff is probably meant to be permanent and it's not really *all* gone, so I still ironed my fabric and let it dry flat, but it was significantly softer than compared to what I started with.
Method Two - the one that worked for me: Upholstering drawer liner
 I decided to wrap a board with the fabric so it would be easily changeable, because the one thing I do like about the old fashioned (plastic?) drawer liners is they are easy to clean and wipe down. This method of drawer liner gave me the visual "pop" I craved but it's still temporary in case I change my mind later.
 Last, I wrapped the board in my Robert Allen blue dot material. But it needed more convincing than just glue. If you look closely, you can see where I used a household stapler (in addition to the glue). I used a extra bit of felt where I wanted to staple to make sure it wouldn't go through to the other side. Classy, I know, but it worked and was so easy! I even added a bit of ribbon to help pull the drawer bottom out if I ever need to.
Then I dropped them into the drawers (with the ribbon towards the back). And VIOLA! The finished product. I hope our guests are pleasantly surprised when they look in their nightstand!

My first attempt to use "stiffened" fabric as a drawer liner was an utter failure. Using fabric inside the drawer seemed ideal - this way you can find something exactly your style and cover up the insides of the less than perfect vintage drawers.
The technique and instructions I found at Blue Eyed Yonder basically involved soaking fabric in a fabric stiffener and ironing fabric flat before it dries. Then you take your perfectly flat and stiff fabric and cut to the dimensions of the drawer and use double sided tape to make it stick. Hmmm. Sounds easy, right? And her Pinterest worthy photos show gorgeous results, so it obviously works for most people. Except for me.
Where I went wrong (if you're a skimmer, the last lesson is probably most important):
- Attempting to iron fabric damp with a liquid similar to glue is going to make you have a bad time. It gunked up my iron pretty good, so then I had to deal with that. Working with a large amount of sticky fabric was not fun either.
LESSON: Plan for iron to get messy and allow serious clean up time. Cut fabric into manageable sizes BEFORE adding stiffener. This. My fabric size was annoyingly large. - After fabric dried all the way, I realized the fabric stiffener didn't really soak through everywhere evenly, so it created different textures throughout the fabric. Some areas were more stiff than others.
LESSON: Cut fabric into smaller batches. Use bigger bowl to be sure you can really work the product into the fabric. Use more fabric stiffener and liquid. Honestly, I thought I had coated it fairly evenly, but trying not to make a mess and rotating that much fabric in a small bowl was not easy. Ugh. I still thought I could "save" the project, so I went back and painted on more fabric stiffener onto the softer sections of fabric (see photo), which actually worked.Until...
 - Even after gunking up your iron and trying to make sure fabric is hanging super flat to dry, it still had a weird texture to it. Not like paper. Unless it's like a piece of paper you wadded up and then tried to iron flat. It looked like that. I even tried to iron it again (dry). More gunk on the iron with no results.
LESSON: Try using a light weight fabric. I think the fact that I used a canvas-like home decor weight fabric may have sabotaged this from the beginning.
Saving the project
I realized if the steam in my iron was reactivating the dried fabric stiffener, then maybe I could wash out the stiffener and still use the fabric. I cut out a section of the fabric a few inches larger than the nightstand's drawer and rinsed it out with lots of water. The water had some bubbles and a light milky color, so I realized the fabric stiffener was actually washing out of the fabric. This stuff is probably meant to be permanent and it's not really *all* gone, so I still ironed my fabric and let it dry flat, but it was significantly softer than compared to what I started with.
Method Two - the one that worked for me: Upholstering drawer liner
I decided to wrap a board with the fabric so it would be easily changeable, because the one thing I do like about the old fashioned (plastic?) drawer liners is they are easy to clean and wipe down. This method of drawer liner gave me the visual "pop" I craved but it's still temporary in case I change my mind later. - First I cut cardboard about 1/4" smaller than my actual drawer dimensions to allow room for the fabric. You could use foam core board, but I happened to have brand new cardboard leftover.
- Next, wrap the board in felt. This gives it a little more substance and gives a slight upholstered look. Lots of glue and it stuck nicely to my board.
Last, I wrapped the board in my Robert Allen blue dot material. But it needed more convincing than just glue. If you look closely, you can see where I used a household stapler (in addition to the glue). I used a extra bit of felt where I wanted to staple to make sure it wouldn't go through to the other side. Classy, I know, but it worked and was so easy! I even added a bit of ribbon to help pull the drawer bottom out if I ever need to. Wednesday, January 8, 2014
Wall Decor: DIY Framed Agate Slices
 After drooling over Horchow's framed agate slices, priced at $245 each (yes, EACH!), I was determined to make a set for myself and not sacrifice style.
 I love with how this DIY project turned out - and at just $25 each!
When they came out looking so spiffy, I contemplated hanging in my room so I could see them more often. The variety of colors and movement is really stunning in person.
Wednesday, September 11, 2013
Winning at Craig's List - New Dresser & Nightstand
I finally have my own Craig's List success story! This pair of blue beauties are scheduled to be delivered this Sunday. I hope I'm not jinxing it, but I'm too excited to contain myself.


The plan is for both to go in the guest room. The dresser will go on the wall opposite the bed.
My friend K recently bought a steal of a baby change table that was still in stores for $200 more than what she paid. It served as a good reminder not to give up on CL.
When searching for dressers, I was actually looking for a quality piece I could paint myself to use in the guest room.
And when I stumbled across this one (already painted in a coordinating color!) I was so giddy I sent a text to the number right then and there.
No response. For days! That's an eternity to walk around with your fingers crossed.
Just as I decided it wasn't meant to be, I get a text that it IS still available. Yay! Turns out the seller does this as a weekend hobby, so she was just waiting to have free time.
We chatted on the phone and she was absolutely super nice and friendly. She was even willing to wait for me to return from a scheduled trip out of town. I admit, it even crossed my mind to look into changing my flight if the seller couldn't wait.
Coincidently, my mom and step-dad arrive for a long weekend visit tomorrow, so while I wish they could use & enjoy the new furniture over the weekend, I'm glad they'll at least get to see what's in store for them on their next visit since it'll arrive the morning of their departure.
And hubs? He's the best ever. He was driving while I chatted with the seller for the first time, only hearing half the call. When I hung up, it didn't even phase him. He just had this look with a grin that said, "what are you up to now?" I shared what I had found on CL and how it was a great deal for furniture that was already painted the perfect color. I don't think he even asked what it looked like. Such a guy!
Tuesday, August 13, 2013
Pillow Shams for Guest Room
Finally stuffed the navy Schumacher Betwixt pillow shams and added them to the bed! They've been sitting empty in the guest room patiently waiting for some attention, so I feel like I owe it to them.


I love the shams, but not sure that I love how the bed is made. Thinking the pillows make too much of a triangle. Now that I look at it, I know why I don't like it... it reminds me of the pin set-up at a bowling alley. Argh! Not good. I will have to play with it more. Lots more!
Walking into the guest room reminded me how much is still needed in there. It's so easy to forget until you have company coming!
Seriously haven't even started looking for something to hang above the bed, but when I see the room in a photo, I can see the glaring empty spot that is so easy to overlook in person.
Monday, July 29, 2013
Painting the Townhouse Gray
Eeeny meeeny miney mo!
The colors look very different in the photo but it just shows how you can have five fabulous recommended colors and it's still a tough decision.


Since we've moved cities a few times, our first home has since became a rental. The townhouse was originally painted in beige/cream color (called Ceyon) but we wanted to update it with a neutral gray to give it a more contemporary look. Paint color and carpets would need to be picked out in person, so I flew down to check it out. Eventually picked Sherwin Williams Amazing Gray paint (SW 7044)!
The colors look very different in the photo but it just shows how you can have five fabulous recommended colors and it's still a tough decision.


Since we've moved cities a few times, our first home has since became a rental. The townhouse was originally painted in beige/cream color (called Ceyon) but we wanted to update it with a neutral gray to give it a more contemporary look. Paint color and carpets would need to be picked out in person, so I flew down to check it out. Eventually picked Sherwin Williams Amazing Gray paint (SW 7044)!
Monday, June 17, 2013
Chinese Chippendale Chair Before & After

Found it! A Chinese Chippendale (bamboo) style chair has been added to the guest bedroom's desk this week. Yay!
After searching and searching, style chair was either only sold in sets or was quite expensive (Jonathon Adler's version starts at $500).
One night, a forum poster on DecorPad.com also suggested the Chinese Chippendale style for my Natura desk, so I thought I'd try looking just one more time. This time my google-fu stumbled on this chair being offered by One Kings Lane. It was not the right color and I had been hoping to find a $10 Craig's List chair, BUT since it was the first reasonably priced chair I had seen that was not sold in pairs, I jumped on it.
Lessons Learned
- Customizing the chair is as easy as "they" say!
A little paint and fabric and the chair was my own style. While it took time, the level of skill required was minimal. I could see this chair being many different colors long into the future! - Painting with a brush works too.
Since I am in a high-rise building, spray painting is not an option (sad face!). If I hadn't already painted my dining chair legs, I would have been nervous about streaks and brush strokes, but those turned out really smooth. And the chair looks great too! No brush strokes at all. - Work fast with latex paint!
The white high gloss paint dried so fast that I had to be extra careful not to go over recently painted sections. Attention had be taken to smooth out paint bumps or drips right away, since it might be too tacky to smooth out later. With other paint types, I never had the hurry and do it right feeling like I did with this. =) One tip given to always keep a wet edge of paint when using latex. Good advice. - Be strategic about the order you paint sections.
The chair back took a lot of time to paint because of all the small nooks and angles, and a lot more touch up was necessary because it was really hard to get good paint coverage in certain spots.
I found it worked best to start by painting a thin layer of paint on those difficult spots first, then paint the remainder of the chair and then go back to the difficult spots again. By the time I worked my way to the trouble areas, the were dry enough for me to paint again.

- White gloss latex paint (dried super fast, just needs 2 hrs between coats)
- fine grit sand paper
- 1 1/2" synthetic paint brush (had at home)
- this chair needed 3 coats (minimum). I bought an 8 oz paint can, and used less than half the can. Since white isn't a saturated color, I would have been find with a sample size 4 oz container.
- About 3/4 of the yard of fabric I purchased at a local fabric store
- Staple gun to secure fabric to seat (had at home)
- Drop cloth to protect floors and collect dust from sanding
As I'm typing this list, I realized I only sanded my chair and didn't get paint with primer mix it (my usual method). Ugh. Fingers crossed it doesn't start to bubble or crack. Regardless, I love my chair!
 |
| Guest bedroom |
The room is still a work in progress, still looking for
- artwork for above the bed
- navy euro shams (scheduled to ship this week)
- nightstand or small chest of drawers for the side opposite the desk
- large scale artwork for the wall opposite the bed. Or maybe a dresser?
Obviously a guest room doesn't really need a dresser, but I was thinking I could use 1/2 to stash some sewing goodies. Ha!
Tuesday, April 9, 2013
Sewing Reveal: Split Shower Curtain Drapes
Super excited to show off my new shower curtain panels! These are functional shower curtains - and hung on just one shower curtain rod. Yippee!
It felt so good to finish them and even better to finally have something hanging up in the bathroom. It was impossible to get a decent photo, they're over 8 feet tall and in our smallest bathroom (no room to get a wide shot).


Deciding on a Plan of Attack


My hubs was super sweet and let me drag him out of bed (he was reading) to indulge me to go see them finished and hanging up. You know that giddy feeling of finally finishing... I was bursting to show him the mess on the dining table was worth it.
It felt so good to finish them and even better to finally have something hanging up in the bathroom. It was impossible to get a decent photo, they're over 8 feet tall and in our smallest bathroom (no room to get a wide shot).
 |
| On the right is the batik art that started it all |
 |
| Lining ready to be pinned |
After I schemed the details out of what I wanted to make, I used Midwest Magnola's tutorial on sewing lined curtain panels. After poking around a lot of sites, hers was by far the clearest. If you can't tell, I respond to lots of photos, and she had photos of each step. I measured my shower and decided I wanted each panel to measure 36" x 98".
For the Borders
I wanted the corners mitered, like how the points of a photo frame come together at the perfect angle. The tutorial at Saltwater Quilts helped get that done. Once the border attached was attached, I just treated the it all like one piece of fabric for Midwest Magnola's instructions.
Then followed the tutorial's instructions for attaching the lining and finishing the bottom hem.
Finishing the Top Hem
I finished the top hem differently than the tutorial since I wasn't planning to use clip rings and was using a 5" hem. I had read another tutorial that suggested an even bigger hem (as in 10-15" extra fabric, folded over). But it seemed a bit excessive me and I was a little short on fabric so I improvised and sort of split the difference between the tutorials.
- Turned down the fabric 6" and pressed. Then open. That crease will the the top of the curtains when it's all done, so I inserted header tape here to give it more structure - you can sort of see the white strip showing through the lining in the photos below. I just basted by hand to be at the very top of my hem once it's finished.
- Then turn down fabric edge 1/2" and press, then turn again and press. So you have a nice finished edge (like the photo on the right).
- I tucked a stripe of witch stitchery, then sewed the folded edge and witch stitch.
- Ultimately I decided a tab backed panel was the way to go since I wanted to hide the shower rod. Using grosgrain ribbon was the easiest, so I cut 7 "tabs" and spaced them out evenly. I picked 7 to correlate with the number of holes on the plastic liner. And rather than sewing them down flat, I used a spool of thread as a guide after seeing the tip here.
- This would be the time to sew the tabs on to the back most layer (in the right photo below, the tabs would be sewn to the section of material that is folded back). By attaching to just the one single back layer, there won't be a ton of nasty stitches on the front.
- Once the tabs are sewn on, just sew a straight line along the edge. Or you can take the easy way, like me and use more witch stitchery. Then iron accordingly.
My hubs was super sweet and let me drag him out of bed (he was reading) to indulge me to go see them finished and hanging up. You know that giddy feeling of finally finishing... I was bursting to show him the mess on the dining table was worth it.
Tuesday, March 19, 2013
Next Project: Shower Curtain Drapes
 |
 |
 |
my existing towels and batik art |
Plus, the lack of a shower curtain was really starting to bug - it was time for something to happen.
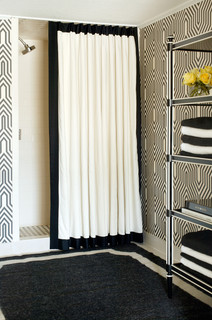
Loving the split look of extra tall "shower drapes" (the gray & white striped here).
The style of the black & white bath with it's simple border and hidden hardware is perfect.
 |
| my "sketch" of the shower curtain to match the towels |
Planning the Layout
I toyed with a few ideas - but kept coming back to the simplicity of the edged border. Plan was to hang the panels high enough to cover the hardware and emulate the look of ceiling mounted tracks (as in the black & white example above). Finding just the right color of fabric available in BOTH colors became a challenge in itself, but JoAnn Fabrics online had exactly what I needed and lucky me, it was on sale.
Other layouts considered...


More Inspiration Photos...
 |
| Mid-century yellow & gray on HGTV |
 |
| Atlanta Homes found on A Life's Design |
 |
| Cornice Board DIY by Gus and Lula |
 |
| Model home found by Beach Brights |
Tuesday, January 29, 2013
New Photos of Curtains Installed!
The draperies I had made in Shanghai have been up and installed since July, but am just now posting photos. Oops! In person they are a woven gray blend with a slight hint of blue, they take on all sorts of shades in these photos.
 |
| Installers hard at work! |
Finding a Contractor
It took some shopping around to find a place that would actually follow-up on the work. We'd sit and chat about what I needed, and they'd tell me to expect a call/email next week with the formal quote and the estimated start date. And then - nothing! It was sort of pathetic (and frustrating!) to see two of the more popular window treatment businesses operate like that.
For a while I thought I might have to install them myself, but thank goodness my sanity came back and I found a terrific local company to install them.
 |
| Freshly installed (typical: split centered on each window) |
Installation Day
Due to the nature of the windows, we went with ceiling mounted aluminum tracks. Watching the install made me appreciate the work that goes into it (and reaffirmed my decision to hire it out, ha!). Plus I would have been way over my head with our concrete ceilings - the guys used a special drill and drill bit for the concrete.
I was super excited they were able to install the 2 center panels to split open on the center of each window (typical) AND also be able to treat the corner windows as one; with the split at the two window's corner. Not sure if that makes sense, but the photos show what I'm trying to say.
 |
| Curtains opened across both windows |
Mostly I was afraid the drapes would be too heavy to be in just two corners (they weigh ~75 lbs) but the installers used extra mounting brackets and spaced them closer together than a standard install to make it feasible. Big difference in my opinion and totally worth it!
Next Project...
 |
| Fabric wall on cloudy day |
It's funny to see the shelves in a photo (over by the left window), because it serves as a glaring reminder that I need to properly stage them, but I really don't like knick-knacks in general so it goes against all my instincts - hence the lack of anything being done about it. Would love ideas on what to do with so many tiny shelves close together. Just becomes such a low priority.
And I *really* need to find an over-sized painting for the left wall (not shown). Or maybe compose a "gallery wall" in the interim, but of course I'd rather have art. Heh heh.
Friday, June 1, 2012
Souvenir from Shanghai: Custom Curtains

Store Bought Window Panels?
Nope, panels are sold in standard 50" widths, would require way too many, and that many panels would not be the least bit attractive.
Made to Order Curtains?
Online quotes were around the $4,000 range. Um, not even a consideration, no way!
Sewing the Curtain Panels Myself?
Free labor! I can sew, so I just buy the material, easy peasy, right? But the realities of working with that much material made me very nervous. And very very scared.
Fly to Shanghai for Custom Curtains? WINNER!
Ordering from the Shanghai Textile Market
 |
| Selected Material |
After visiting a few shops, they had the largest fabric selection were super patient with my lack of Chinese, although my iPhone's iTranslate app came in super handy dandy. I paid for half of my order and then paid the other half at pick-up a week later. If I had paid in full, they would have had them delivered to me. A week later, I wished I had done just that and saved 2 hours in the car just to pick them up. But it gave me the opportunity to make sure I was getting the correct order & potentially correct any issues since I was leaving town very soon after.
Price Comparison
I priced by the foot when doing my homework so I could try to compare apples to apples.
- My finished curtains (lined) cost about 6.9 RMB per foot (around $1.10/ft depending on exchange rate) and they even included curtain hooks too.
- An UNlined panel at PotteryBarn withOUT hooks runs about $2.68/ft.
- Custom order from the Shade Store (unlined) was about $9.96/ft. Ouch.

Believe it or not, I was able to squish the 3 bags of curtains into that big suitcase, but then realized the bag was over weight (~70 lbs!) so I bought a suitcase in Shanghai (cheaper than the airline's overweight fee). And since I only took one bag with me to Shanghai, I was still within my baggage allowance. Whoo hoo!
Next Step - hanging them!
It's been a month and they're not up yet! Agh! I know! Hubs is starting to ask. Planning to visit a local shop for a quote for the ceiling tracks & installation on Monday.
Can't wait to post a photo of them installed!
