Showing posts with label curtains. Show all posts

Friday, October 31, 2014

Sewing: Lined Curtains (Steps 6-10)

Continuing the steps to sew the curtain panels...


Before and after, what a difference!

Previously we
Determined how much fabric we need
* Completed the sewing steps part one of this post (steps 1-5)


Sewing: Lined Curtains (Steps 1-5)

While it's easy enough to buy curtain panels, they typically only come in standard sizes and windows tend to be anything but standard, which is why you are probably here trying to decide if it's worth making your own.  

If you have a sewing machine (or can borrow one), the answer is YES! Try not to be intimated by the outrageous pricing of custom drapes.  The online quote for drapes in the exact same fabric was $1,992.  Sewing a few straight lines is child's play compared to that sticker shock.  


If you are following along from my last post where we calculated fabric needs, you hopefully have your curtain rod or curtain track hung with the hooks/clips to make measuring easier for the next steps.  If you don't, no worries, I didn't have my curtain track up, so I found its measurements and the measurements of the carriers for my curtain track online to help me plan (carriers are the equivalent of a drapery ring when using curtain tracks).

The steps below assume you have purchased the amount of fabric needed, found in the previous post explaining how to calculate fabric needs.  I've tried to cut down the explanation to make it easier to just follow step by step without getting too lost in the details, but included links to tutorials I found helpful if you need more explanation.  And amazon links are affiliate links.

Thursday, July 10, 2014

Next Project: Lined Curtains for Guest Room

Have you ever slept in your guest bedroom?  Not a nap, but a real overnight visit to experience the bedroom from your guests' perspective?  It sounds completely logical, but it never crossed my mind until an article suggested doing just that to help you discover what your guest room might be missing.

While the hubs was out of town, I camped out for a couple nights in the guest bedroom to check it out.  The change of view was pretty fun.  One of the things I noticed was how the sun seemed to arrive slightly earlier and brighter than my own bedroom; despite the existing window shades. Obviously I'm exaggerating, but I thought adding curtains might be a nice touch to soften the look of the room, added functionalality, and it'd be a fun sewing project for me.

Tuesday, April 9, 2013

Sewing Reveal: Split Shower Curtain Drapes

Super excited to show off my new shower curtain panels!  These are functional shower curtains - and hung on just one shower curtain rod.  Yippee!

It felt so good to finish them and even better to finally have something hanging up in the bathroom.  It was impossible to get a decent photo, they're over 8 feet tall and in our smallest bathroom (no room to get a wide shot).


On the right is the batik art that started it all

Deciding on a Plan of Attack
Lining ready to be pinned
After I schemed the details out of what I wanted to make, I used Midwest Magnola's tutorial on sewing lined curtain panels.  After poking around a lot of sites, hers was by far the clearest.  If you can't tell, I respond to lots of photos, and she had photos of each step.  I measured my shower and decided I wanted each panel to measure 36" x 98".

For the Borders
I wanted the corners mitered, like how the points of a photo frame come together at the perfect angle.  The tutorial at Saltwater Quilts  helped get that done.  Once the border attached was attached, I just treated the it all like one piece of fabric for Midwest Magnola's instructions.

Then followed the tutorial's instructions for attaching the lining and finishing the bottom hem.

Finishing the Top Hem
I finished the top hem differently than the tutorial since I wasn't planning to use clip rings and was using a 5" hem.  I had read another tutorial that suggested an even bigger hem (as in 10-15" extra fabric, folded over).  But it seemed a bit excessive me and I was a little short on fabric so I improvised and sort of split the difference between the tutorials. 
  • Turned down the fabric 6" and pressed.  Then open.  That crease will the the top of the curtains when it's all done, so I inserted header tape here to give it more structure - you can sort of see the white strip showing through the lining in the photos below.  I just basted by hand to be at the very top of my hem once it's finished.
  • Then turn down fabric edge 1/2" and press, then turn again and press.  So you have a nice finished edge (like the photo on the right).
  • I tucked a stripe of witch stitchery, then sewed the folded edge and witch stitch.   


  • Ultimately I decided a tab backed panel was the way to go since I wanted to hide the shower rod.  Using grosgrain ribbon was the easiest, so I cut 7 "tabs" and spaced them out evenly.  I picked 7 to correlate with the number of holes on the plastic liner.  And rather than sewing them down flat, I used a spool of thread as a guide after seeing the tip here.  
  • This would be the time to sew the tabs on to the back most layer (in the right photo below, the tabs would be sewn to the section of material that is folded back).  By attaching to just the one single back layer, there won't be a ton of nasty stitches on the front.
 

  • Once the tabs are sewn on, just sew a straight line along the edge.  Or you can take the easy way, like me and use more witch stitchery.  Then iron accordingly.  
Viola!  All done.  Hang them up!

My hubs was super sweet and let me drag him out of bed (he was reading) to indulge me to go see them finished and hanging up.  You know that giddy feeling of finally finishing... I was bursting to show him the mess on the dining table was worth it.


Tuesday, March 19, 2013

Next Project: Shower Curtain Drapes


Pinterest is full of inspiration - but this time I decided to take action!   Current project is making "shower drapes" for our hall bath.  Our little batik art & towels coordinated well, but I could never find the right shower curtain.  The look of split shower curtains really caught my eye - check out the photos that inspired me below.

my existing towels and batik art


Plus, the lack of a shower curtain was really starting to bug - it was time for something to happen.


Loving the split look of extra tall "shower drapes" (the gray & white striped here).  
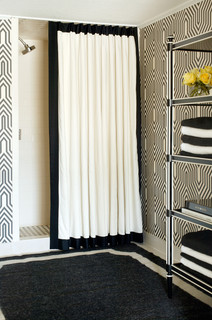
The style of the black & white bath with it's simple border and hidden hardware is perfect. 

my "sketch" of the shower curtain to match the towels

Planning the Layout
I toyed with a few ideas - but kept coming back to the simplicity of the edged border.  Plan was to hang the panels high enough to cover the hardware and emulate the look of ceiling mounted tracks (as in the black & white example above).  Finding just the right color of fabric available in BOTH colors became a challenge in itself, but JoAnn Fabrics online had exactly what I needed and lucky me, it was on sale.


Other layouts considered...

More Inspiration Photos...

Mid-century yellow & gray on HGTV
 
Atlanta Homes found on A Life's Design


Cornice Board DIY by Gus and Lula

Model home found by Beach Brights


Tuesday, January 29, 2013

New Photos of Curtains Installed!


The draperies I had made in Shanghai have been up and installed since July, but am just now posting photos.  Oops!  In person they are a woven gray blend with a slight hint of blue, they take on all sorts of shades in these photos.

Installers hard at work!
Finding a Contractor
It took some shopping around to find a place that would actually follow-up on the work.  We'd sit and chat about what I needed, and they'd tell me to expect a call/email next week with the formal quote and the estimated start date.  And then - nothing!  It was sort of pathetic (and frustrating!) to see two of the more popular window treatment businesses operate like that.  

For a while I thought I might have to install them myself, but thank goodness my sanity came back and I found a terrific local company to install them.  
Freshly installed (typical: split centered on each window)

Installation Day
Due to the nature of the windows, we went with ceiling mounted aluminum tracks.  Watching the install made me appreciate the work that goes into it (and reaffirmed my decision to hire it out, ha!).  Plus I would have been way over my head with our concrete ceilings - the guys used a special drill and drill bit for the concrete.  

I was super excited they were able to install the 2 center panels to split open on the center of each window (typical) AND also be able to treat the corner windows as one; with the split at the two window's corner.  Not sure if that makes sense, but the photos show what I'm trying to say. 
Curtains opened across both windows

Mostly I was afraid the drapes would be too heavy to be in just two corners (they weigh ~75 lbs) but the installers used extra mounting brackets and spaced them closer together than a standard install to make it feasible. Big difference in my opinion and totally worth it!

Next Project...
Fabric wall on cloudy day 
It's funny to see the shelves in a photo (over by the left window), because it serves as a glaring reminder that I need to properly stage them, but I really don't like knick-knacks in general so it goes against all my instincts - hence the lack of anything being done about it.  Would love ideas on what to do with so many tiny shelves close together.  Just becomes such a low priority.
And I *really* need to find an over-sized painting for the left wall (not shown). Or maybe compose a "gallery wall" in the interim, but of course I'd rather have art. Heh heh.


Friday, June 1, 2012

Souvenir from Shanghai: Custom Curtains

We love that our living room has floor to ceiling windows and planned to live with them open, but sunny days meant it was hard to cool the room and there was a glare on the afternoon football game (that convinced the hubs!). And so I started looking at options.
Store Bought Window Panels?
Nope, panels are sold in standard 50" widths, would require way too many, and that many panels would not be the least bit attractive.
Made to Order Curtains?
Online quotes were around the $4,000 range. Um, not even a consideration, no way!
Sewing the Curtain Panels Myself?
Free labor! I can sew, so I just buy the material, easy peasy, right? But the realities of working with that much material made me very nervous.  And very very scared.
Fly to Shanghai for Custom Curtains? WINNER!
I'm traveling to China anyway and I remembered having a custom window seat cushion made at the Textile Market while we were living there - and they sell curtains too. SCORE!

Ordering from the Shanghai Textile Market
Selected Material
My very first day back in Shanghai, with my measurements and plenty of photos in hand, I headed to the market in the Putuo district. In case you ever decide to go, it's about an hour west of Shanghai's downtown area by car. Shanghai Textile Market: 1618 Cao An Lu (上海市曹安路1618号轻纺市场一区一楼1054#-1058#). The shop I used was just to the right of building entrance #3 in suites #1054 - #1058 (http://www.jl-xhl.com).
After visiting a few shops, they had the largest fabric selection were super patient with my lack of Chinese, although my iPhone's iTranslate app came in super handy dandy. I paid for half of my order and then paid the other half at pick-up a week later. If I had paid in full, they would have had them delivered to me. A week later, I wished I had done just that and saved 2 hours in the car just to pick them up. But it gave me the opportunity to make sure I was getting the correct order & potentially correct any issues since I was leaving town very soon after.

Price Comparison
I priced by the foot when doing my homework so I could try to compare apples to apples.
  • My finished curtains (lined) cost about 6.9 RMB per foot (around $1.10/ft depending on exchange rate) and they even included curtain hooks too.
  • An UNlined panel at PotteryBarn withOUT hooks runs about $2.68/ft.
  • Custom order from the Shade Store (unlined) was about $9.96/ft. Ouch.
Getting them home
Believe it or not, I was able to squish the 3 bags of curtains into that big suitcase, but then realized the bag was over weight (~70 lbs!) so I bought a suitcase in Shanghai (cheaper than the airline's overweight fee). And since I only took one bag with me to Shanghai, I was still within my baggage allowance. Whoo hoo!
Next Step - hanging them!
It's been a month and they're not up yet! Agh! I know! Hubs is starting to ask. Planning to visit a local shop for a quote for the ceiling tracks & installation on Monday.

Can't wait to post a photo of them installed!
Related Posts Plugin for WordPress, Blogger...